So this Christmas I decided to make him his own sword and shield using felt, cardboard, and the handle to my swiffer mop, which I broke trying to walk through a doorway with the mop parallel to the floor. So far he loves them and knew exactly what to do to get that shield on his arm. Mr. Jiggs and he have spent hours already chasing dragons and sword fighting together.
Here's what I did.
Keep the cardboard circles from your next couple of frozen pizzas. Find two the same size. Trace the circles onto felt.


Cut around the circle about 5/8 of an inch bigger than the circle.

Make two circles like that.

Find a design you like to decorate the front of the shield and cut it out. Mine had several colors to it, but here is the first layer.

Pin it down and top stitch it.

Do this until your design is complete. See my different colors? The second shield is the same design with blue instead of yellow.

Cut out 6 strips of felt 2-3 inches wides and 6-8 inches long. Put fusible craft interfacing on 2 of them for added stability. These are making the arm holds.
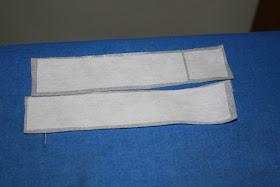
On two more of the strips sew velcro.

Then sew together the two strips with interfacing (inter facings inside) and a strip of felt on top of each strip that has velcro (velcro facing out). You end up with three double layer strips, two of which have velcro on one side.


Pin the one without velcro to the circle without your cool design. (note: pin to the side without the lovely circle traced on it) I used my hand to guess how how much room to leave for the hand.

See how I sewed rectangles with an 'x' inside for added stability? Do the same idea with the strips with velcro to create one strap that velcros open and closed. This is the one to put around your forearm and I though it would be nice to have it adjustable. But it may not be necessary and doesn't need to be SO adjustable. Mine makes room for a very large forearm. You could use less velcro and save some pennies.

Gle a cardboard circle to the 'wrong' side of the felt. I like using rubber cement because it spread quickly and dries quickly.

Then glue the two cardboard circles together. I used Elmer's school glue for a better bond.

But because it doesn't dry as fast, I left it underneath a heavy book to dry. This is our wedding album. Nice and big and heavy.

Once dry, sew around the enge of the circle. You can't get right up next to the cardboard because of your pressure foot (I didn't want to risk sewing through the cardboard, but maybe a different foot like a zipper foot could help. Don't know because I don't have very many special feet for my machine.)

See? not right up to the cardboard, but pretty good.

Then trim the edges to make them pretty and even. More picture will come later, plus how I made the swords.

No comments:
Post a Comment